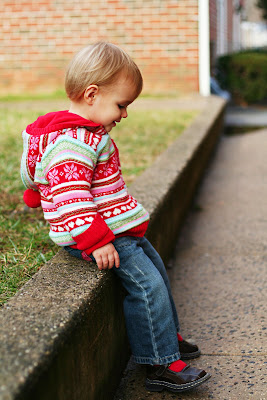
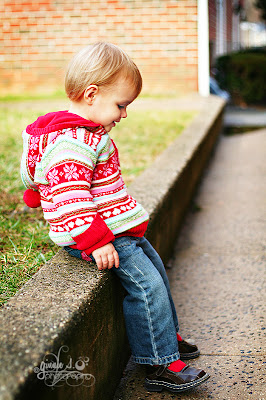
I know these aren't new pictures, but when I first posted them someone asked if I would share what I did in Photoshop to edit them. So here I am! My plan for this week is to {hopefully} post some more before and after pictures.
(I actually think that these pictures look better bigger. If you scroll down a little bit you'll be able to see the original post. )
(I actually think that these pictures look better bigger. If you scroll down a little bit you'll be able to see the original post. )
 This is the original image SOOC (straight out of camera)
 This is the image after I ran an unsharp mask on it (basically that just means I sharpened it), then I lightened it and added contrast to the image using curves. I also boosted the saturation to about +12. And last, I added a soft light and then changed the opacity to about 30 percent.
 After I did the above edits the image still looked a little dark to me. So I lightened it once more using curves. Then I used the sponge tool (saturate) to bring out a little bit more of the color in the brick and the grass. Next I used the dodge tool (lighten) up part of Macie's profile around the eyes, nose, mouth and forehead. And lastly, I burned (darkened) around the edges to add depth and contrast.
 Here's the SOOC image and the photoshopped image side by side.


14 comments:
like the edited version on this. thanks for sharing the steps you took!
Nice conversion, I will tell Janae that you posted it so she can check it out. I have one question though, why did you do your sharpening first? Usually it is best to sharpen after you have done all your other edits, or at least that is what I have found by doing it, and from reading what others think. Nice job getting the colors to come out more.
Travis
wow~!~ amazing!
totally rocks!!!!!
you did wonderful with before and after!
tara
Ginnie--nice walk-through explanation on this, and very effective with the before and after side-by-side.
Love seeing your steps of how you did this. The psing made a world of difference in the photo. Thanks for sharing the details!
These are so great. Do you know that I had NO idea that was the what the sponge tool was for! Gosh...thanks for sharing. Now I am going to use it all the time. :)
She is such a cutie, and its a great outfit.
Thank you for showing us your steps and the side-by-side comparison. I am learning a lot!
I like how you brightened up the colors. I need to learn how to edit just parts of a photo like that.
Travis-
I usually run the unsharp mask at the beginning because I like to use the USM to add contrast.
The values I set are different for adding the contrast versus "real" sharpening.
I just select a low value for Amount (10-25%), a very high value for Radius (200-300 pixels), and a 0 Threshold.
I usually perform this action along with color and saturation etc. before I do the "real" sharpening. Make sense?
This is great!!! Thanks also for explaining what you do!
Cari
Great photo and great explanation
Very nice to have the steps you used and the side-by-side. She's a doll and the sweater is beautiful.
Love this!!
Thanks for the little tutorial! I was just trying to figure some of this out on my own last night. Now I have some more ideas to work with and it will take me less time without all the guesswork. Thanks!
Post a Comment