
Some of you asked how I achieved the look in my last post and I am more than happy to share . So here you go...
Due to the lack of creativity we shall call this lesson
How to achieve the Old Vintage Textured Written-On Look
(so clever... I know)
 First things first.
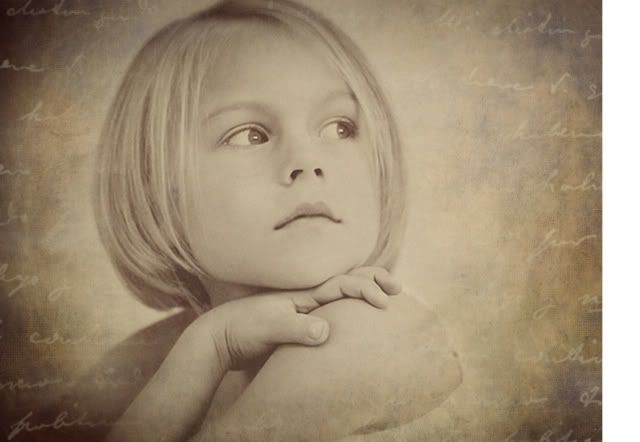
Open up the image you want to work with in Photoshop. I chose Abrie 'cause I think she's kind of cute.

After opening up the image I ran the Pioneer Woman's vintage action on it. If you don't have it and would like to give it a try you can click HERE. (The vintage action is in her first set.)
PS- She just came out with a second set of free actions and they are awesome!
So with just one click....
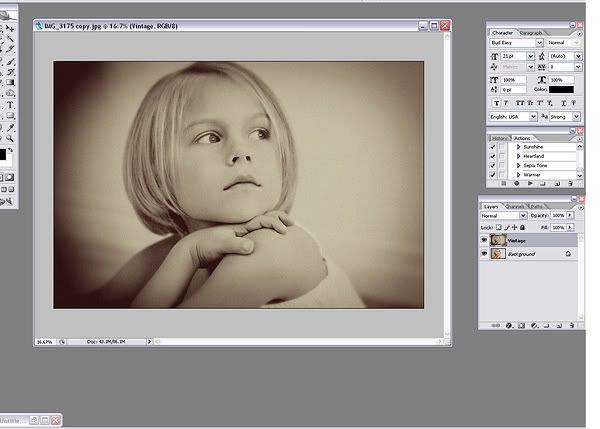
BAMMM! You get instant vintage. The action is just perfect for this image. It gives it such a moody feel. Love it! :)

We have the vintage, now we need to add a little bit of texture.
- Open the texture that you would like to use.
- Minimize the picture. (Abrie)
The texture I used for this picture is called Devils Parchment. I can't remember where I got it or who made it to be able to give them credit, but they get two enthusiastic thumbs up for making this awesome texture.
 You can use your own texture or you can use this one. Just right click on it and save. Note: I usually keep all of my texture's in their own file so they are easier to find.
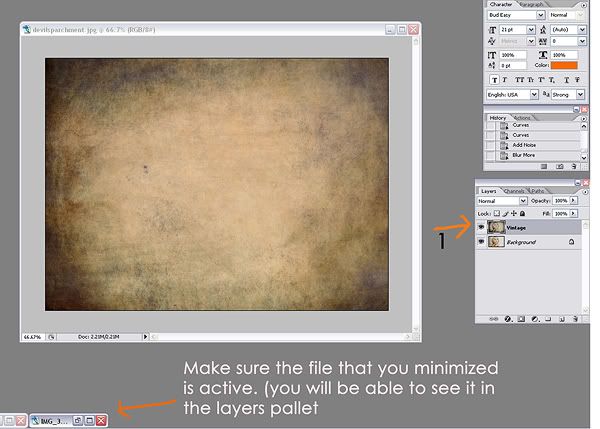
With the picture minimized at the bottom, click on it so it is active. You'll know it is active when you see the picture of it in the layers pallet.
1- Notice in the layers pallet you see the picture of Abrie that we were working on. Click on it, then Drag and drop it on top of the texture we have open.
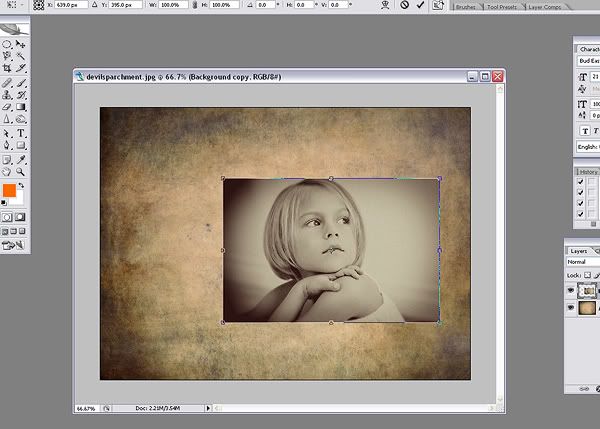
We have succesfully added the picture of Abrie on top of our texture. As you can tell, the picture of Abrie is not the same size as the texture.
- To make Abrie the same size as the texture you need to select the image of Abrie by pressing Ctrl+T at the same time.
With Abrie selected you can now change the size of the image to fit the texture
- While holding down the shift key drag one of the corners to adjust the size of the image.
Note: Holding down the shift key ensures that the image will keep its ratio and not look distorted With Abrie and the texture the same size we are ready to rock & roll.
1- In the layers pallet, with Abrie's picture selected, lower the opacity to 72% so some of the texture shows through.
2- Add a layer mask by clicking on the little rectangle box at the bottom with a circle in it.
3- Select the brush tool.
4- With the brush tool selected change the opactiy to around 30%.
5- Make sure you choose a soft brush (with the feathered edges).
With the layer mask selected, start brushing away the edges. This will erase back part of the picture of Abrie and make the texture show through even more.
Note: Make sure black is selected as the foreground color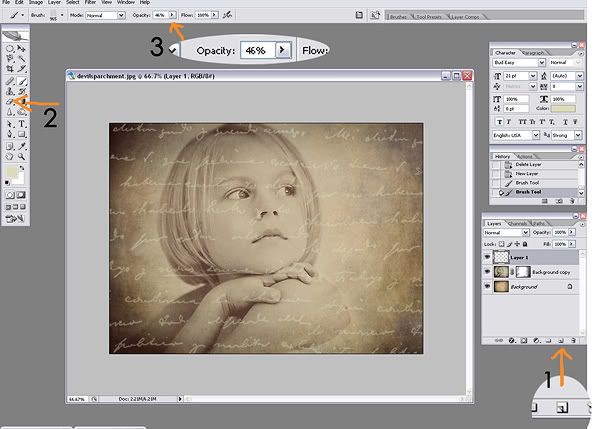
So, we have the vintage. We have the texutre. Now we just need the letters. The brush I used to get the letter effect can be downloaded here --->Handwriting Brush
1- Click on the create a new layer button. Select the handwriting brush and size and place it on the new layer you just created. You can play around with the opacity in the layers pallet. I have the opacity turned down to about 60%.
2- Select the eraser tool
3- Lower the opacity of the eraser tool between 30%- 45% and erase back the handwriting brush so it's not too overwhelming.
Now all you have left to do is flatten the image and save it. And if you're awesome like me you can name it The Old Vintage Textured Written-On Look picture.
 I'm not sure if this made any sense, but I sure hope so :)


9 comments:
Very cool little tutorial. I need to find time to play around in PS more, for now I stick mainly to lightroom
You're so cool! Thanks so much for sharing.
It certainly did make sense. Gave it a try... love it! Thanks for sharing!!! :0)
I don't remember how I found your blog, but I am SO glad I did!!
I love this lesson, too!! Thanks for being willing to SHARE!! I love learning new Photoshop Tricks!!!
BTW...I also LOVE your actions!!! I use them ALL THE TIME!! You're the best! THANKS! =D
Thanks! I enjoyed this so much. I also am a big fan of your actions!! And pioneer womans too.
Thank you thank you thank you!!! I love it!!!
very cool tutorial, Thanks for sharing!!
Ginnie,
How did you learn all this cool stuff? And here you are teaching other photographers!! Congratulations!
Stacy
Who knows where to download XRumer 5.0 Palladium?
Help, please. All recommend this program to effectively advertise on the Internet, this is the best program!
Post a Comment